docker compose 中间件安装
IMPORTANT
- 下面的操作需要对 linux 和 docker 的知识有一定的了解。
- 下面的操作基于
CentOS 7.6,其他发行版本的命令可能有所不同,操作系统内置的组件也可能有所不同。$符号表示命令提示符,之后的文本是用户在命令行中输入的命令,没有特别说明都是使用root用户进行操作。 - 下面的链接具有时效性,失效后需到对应的官网查找最新的地址。
安装 docker 引擎
TIP
对于国产的操作系统,根据其衍生自的发行版本安装文档操作。
使用 rpm 仓库安装
更推荐使用这种方式安装,它会自动解决安装时的组件依赖问题。
$ yum install -y yum-utils
$ yum-config-manager --add-repo https://download.docker.com/linux/centos/docker-ce.repo
$ yum install docker-ce docker-ce-cli containerd.io docker-buildx-plugin docker-compose-plugin
$ systemctl enable --now docker
TIP
安装 yum-utils 时遇到不能解析相应的域名的问题,可能是 CentOS7 结束了生命周期,相应的源不再维护了,可以使用阿里的源替代后再尝试。
$ mv /etc/yum.repos.d/CentOS-Base.repo /etc/yum.repos.d/CentOS-Base.repo.backup
$ curl -o /etc/yum.repos.d/CentOS-Base.repo https://mirrors.aliyun.com/repo/Centos-7.repo
$ yum makecache
对于安装 docker 出现同样不能连接的情况,也是可以添加阿里的 docker 源后再次尝试。
$ yum-config-manager --add-repo https://mirrors.aliyun.com/docker-ce/linux/centos/docker-ce.repo手动离线安装
待完善
创建 docker network
为了后续安装的各个服务之间能通过服务名解析到对应的 IP 互相连通,创建一个 docker 网络,各个服务都加入到这个网络中。
$ docker network create y9-share-net启动中间件服务
根据自己的需求安装自己需要的中间件,以下为了清晰将每个中间件分别写在独立的 docker-compose.yml 文件中,实际操作时可根据需要将其合并。 同样的,对于容器的版本、挂载的目录及环境变量配置,也可以根据自己的需要调整。
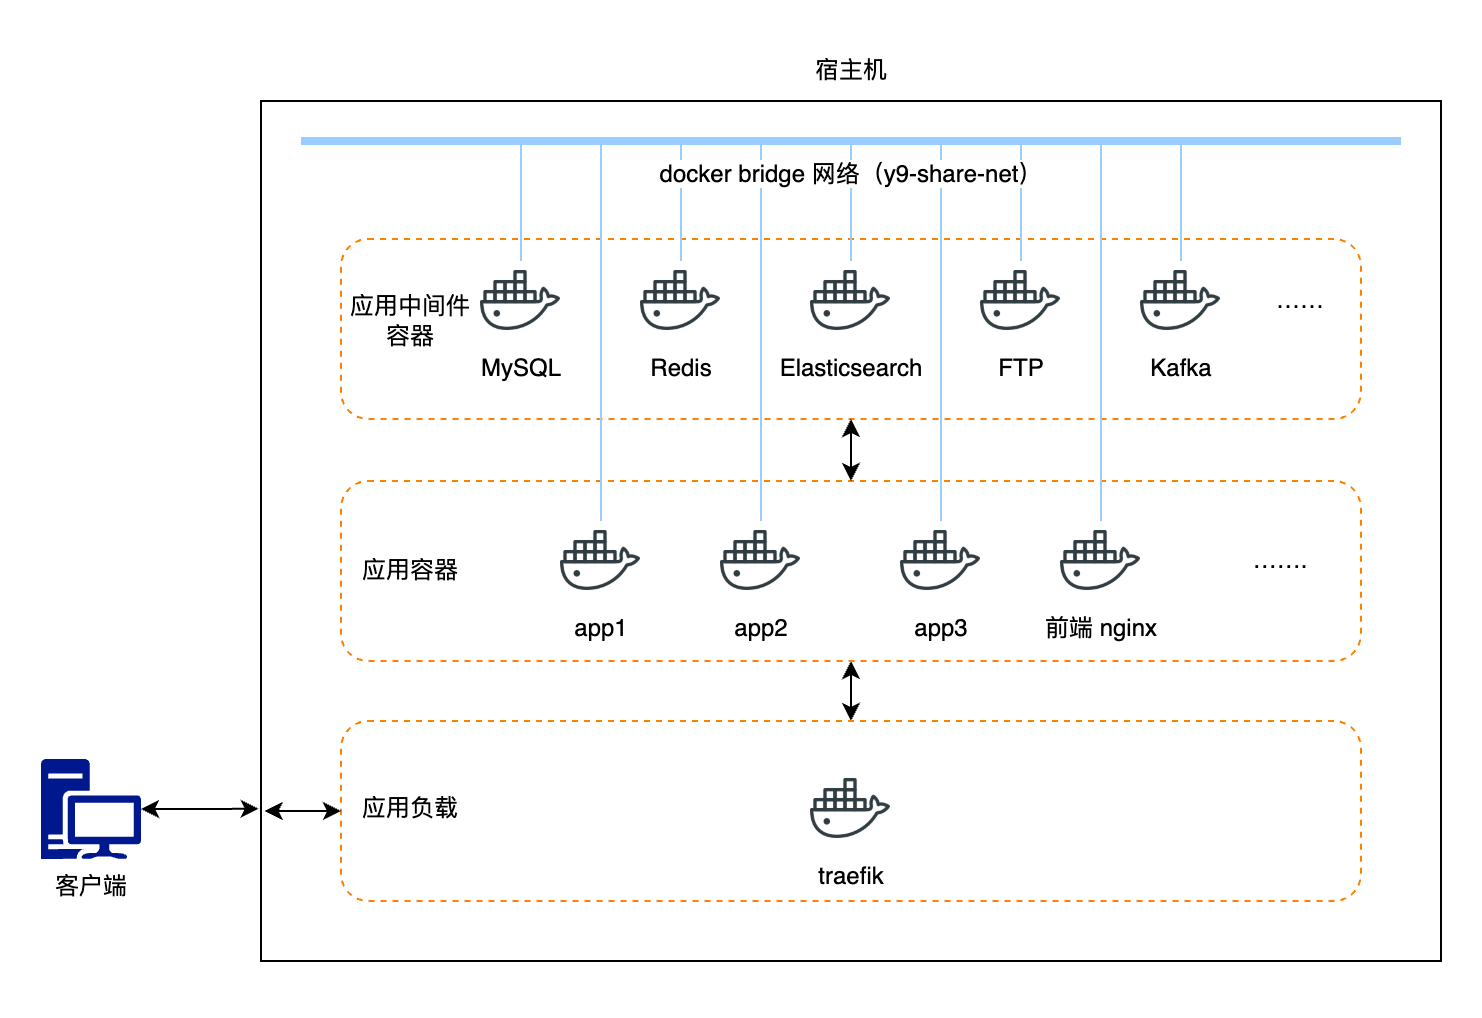
上图为 docker compose 部署完成后的架构图,接下来介绍各个中间件的安装和配置。
Portainer
Portainer 是容器可视化管理平台。
创建 docker-portainer.yml 文件,内容如下:
services:
    portainer: # 服务名,同一个网络中的其他服务可以直接用名称代替 IP 访问
        image: docker.youshengyun.com/base/portainer/portainer-ce:2.33.6
        restart: on-failure:3
        environment:
            - TZ=Asia/Shanghai
        ports:
            - "9443:9443" # https 端口
            - "9000:9000" # http 端口
        volumes:
            - portainer_data:/data
            - /var/run/docker.sock:/var/run/docker.sock
        networks:
            - y9-share-net
networks:
    y9-share-net:
        external: true
volumes:
    portainer_data:
执行命令启动 Portainer:
$ docker compose -f docker-portainer.yml up -d部署完成后可以通过访问 https://localhost:9443 访问 portainer,首次登录需要设置用户名密码。
MySQL
MySQL 用于关系型数据的存储。
创建 docker-mysql.yml 文件,内容如下:
services:
    mysql: # 服务名,同一个网络中的其他服务可以直接用名称代替 IP 访问
        image: docker.youshengyun.com/base/mysql:8.0.41
        restart: on-failure:3
        environment:
            - TZ=Asia/Shanghai
            - MYSQL_ROOT_PASSWORD=111111 # root 密码,按需调整
        volumes:
            - "/data/mysql/data:/var/lib/mysql"
            - "/data/mysql/config/my.cnf:/etc/mysql/conf.d/my.cnf"
        ports:
            - "3306:3306"
        healthcheck:
            test: ["CMD-SHELL", "mysqladmin ping -h localhost -u root -p$$MYSQL_ROOT_PASSWORD || exit 1"]
            interval: 30s
            timeout: 10s
            retries: 3
            start_period: 30s
        networks:
            - y9-share-net
networks:
    y9-share-net:
        external: true
创建数据目录和配置文件目录:
$ mkdir -p /data/mysql/{data,config}其中, /data/mysql/config/my.cnf 文件的内容如下,配置项可以根据服务器的配置及自己的需求调整:
[mysqld]
symbolic-links=0
lower_case_table_names=1
character_set_server=utf8mb4
sql_mode=STRICT_TRANS_TABLES,NO_ENGINE_SUBSTITUTION
max_allowed_packet=1024M

max_connections=500

innodb_buffer_pool_size=4G
innodb_lock_wait_timeout=100
innodb_flush_log_at_trx_commit=2
sync_binlog=1000

sort_buffer_size=2M
join_buffer_size=2M
read_buffer_size=1M
read_rnd_buffer_size=1M

slow_query_log=1
slow_query_log_file=/var/log/mysql/slow.log
long_query_time=3
#log_queries_not_using_indexes=1
expire_logs_days=7

innodb_buffer_pool_dump_at_shutdown=1
innodb_buffer_pool_load_at_startup=1
执行命令启动 MySQL:
$ docker compose -f docker-mysql.yml up -dRedis
Redis 用于缓存及登录票据的存储。
创建 docker-redis.yml 文件,内容如下:
services:
    redis: # 服务名,同一个网络中的其他服务可以直接用名称代替 IP 访问
        image: docker.youshengyun.com/base/redis:7.2.7
        restart: on-failure:3
        ports:
            - "6379:6379"
        environment:
            - TZ=Asia/Shanghai
        command: redis-server --requirepass '111111' --maxmemory 2gb --maxmemory-policy volatile-lru # redis 密码,按需调整
        volumes:
            - "/data/redis:/data"
        networks:
            - y9-share-net
        healthcheck:
            test: ["CMD-SHELL", "redis-cli -a 111111 ping"]
            interval: 30s
            timeout: 5s
            retries: 3
            start_period: 10s
networks:
    y9-share-net:
        external: true
执行命令创建数据目录并启动 Redis:
$ mkdir -p /data/redis
$ docker compose -f docker-redis.yml up -d
Elasticsearch
Elasticsearch 用于日志的存储和检索。
创建 docker-elasticsearch.yml 文件,内容如下:
services:
    elasticsearch: # 服务名,同一个网络中的其他服务可以直接用名称代替 IP 访问
        image: docker.youshengyun.com/base/elasticsearch:7.17.28
        restart: on-failure:3
        environment:
            - TZ=Asia/Shanghai
            - node.name=elasticsearch-node1
            - cluster.name=y9elasticsearch
            #- discovery.seed_hosts=elasticsearch-node1 #多节点
            #- cluster.initial_master_nodes=elasticsearch-node1
            - discovery.type=single-node
            - bootstrap.memory_lock=true
            - xpack.security.enabled=true
            - xpack.license.self_generated.type=basic
            - http.cors.enabled=true
            - http.cors.allow-origin=*
            - http.cors.allow-headers=Authorization
            - ingest.geoip.downloader.enabled=false
            - ES_JAVA_OPTS=-Xms1024m -Xmx4024m # 分配给 elasticsearch 的内存,按需调整
            - ELASTIC_PASSWORD=111111 # elasticsearch 密码,按需调整
        ulimits:
            memlock:
                soft: -1
                hard: -1
        volumes:
            - /data/elasticsearch/data:/usr/share/elasticsearch/data
            - /data/elasticsearch/plugins:/usr/share/elasticsearch/plugins
        ports:
            - "9200:9200"
            - "9300:9300"
        networks:
            - y9-share-net
        healthcheck:
            test: ["CMD-SHELL", "curl -fsu elastic:$$ELASTIC_PASSWORD http://localhost:9200/_cluster/health || exit 1"]
            interval: 30s
            timeout: 10s
            retries: 5
            start_period: 30s
networks:
    y9-share-net:
        external: true
执行命令创建数据目录和插件目录并启动 Elasticsearch:
$ mkdir -p /data/elasticsearch/{data,plugins}安装 ik 分词器
下载页下载对应版本的 ik 分词器插件,解压后将 ik 目录放到 /data/elasticsearch/plugins 目录下。
授权目录给容器用户
$ chown -R 1000:1000 /data/elasticsearch # 容器内的用户 uid 为 1000,不设置会导致权限问题执行以下命令部署 elasticsearch:
$ docker compose -f docker-elasticsearch.yml up -dFTP
FTP 用于文件的上传和下载。
创建 docker-ftp.yml 文件,内容如下:
services:
    ftp: # 服务名,同一个网络中的其他服务可以直接用名称代替 IP 访问
        image: docker.youshengyun.com/base/fauria/vsftpd
        restart: on-failure:3
        environment:
            - TZ=Asia/Shanghai
            - FTP_USER=y9admin
            - FTP_PASS=111111 # ftp 用户名和密码,按需调整
            - PASV_ADDRESS=192.168.3.31 # 服务器内网 IP
            - PASV_MIN_PORT=21100 # 被动模式端口范围
            - PASV_MAX_PORT=21110
        ports:
            - "20:20"
            - "21:21"
            - "21100-21110:21100-21110"
        volumes:
            - /data/ftp:/home/vsftpd
        networks:
            - y9-share-net
#        healthcheck:
#            test: ["CMD-SHELL", "curl --connect-timeout 5 ftp://localhost || exit 1"]
#            interval: 30s
#            timeout: 5s
#            retries: 3
#            start_period: 10s
networks:
    y9-share-net:
        external: true
执行命令创建数据目录并启动 FTP:
$ mkdir -p /data/ftp
$ docker compose -f docker-ftp.yml up -d
Kafka
Kafka 用于消息的发布和订阅。
创建 docker-kafka.yml 文件,内容如下:
services:
    kafka: # 服务名,同一个网络中的其他服务可以直接用名称代替 IP 访问
        image: docker.youshengyun.com/base/bitnamilegacy/kafka:3.7.0
        restart: on-failure:3
        networks:
            - y9-share-net
        ports:
            - "9092:9092"
            - "9094:9094"
        environment:
            - TZ=Asia/Shanghai
            - KAFKA_CFG_NODE_ID=0
            - KAFKA_CFG_PROCESS_ROLES=controller,broker
            - KAFKA_CFG_LISTENERS=PLAINTEXT://:9092,CONTROLLER://:9093,EXTERNAL://0.0.0.0:9094
            - KAFKA_CFG_ADVERTISED_LISTENERS=PLAINTEXT://kafka:9092,EXTERNAL://192.168.3.31:9094 # kafka 内网访问 IP,按需修改
            - KAFKA_CFG_LISTENER_SECURITY_PROTOCOL_MAP=CONTROLLER:PLAINTEXT,EXTERNAL:PLAINTEXT,PLAINTEXT:PLAINTEXT
            - KAFKA_CFG_CONTROLLER_LISTENER_NAMES=CONTROLLER
            - KAFKA_CFG_CONTROLLER_QUORUM_VOTERS=0@kafka:9093
            - KAFKA_HEAP_OPTS=-Xmx2048m -Xms2048m
        volumes:
            - /data/kafka:/bitnami/kafka
#        healthcheck:
#            test: ["CMD-SHELL", "/opt/bitnami/kafka/bin/kafka-broker-api-versions.sh --bootstrap-server localhost:9092 | grep 'ApiVersions' || exit 1"]
#            interval: 30s
#            timeout: 10s
#            retries: 5
#            start_period: 20s
networks:
    y9-share-net:
        external: true
执行命令创建数据目录并启动 Kafka:
$ mkdir -p /data/kafka
$ chown -R 1001:1001 /data/kafka # 容器内的用户 uid 为 1001,不设置会导致权限问题
$ docker compose -f docker-kafka.yml up -d
Traefik
Traefik 用于反向代理和负载均衡,通过 docker、docker swarm 自动发现服务,实现动态路由。
创建 docker-traefik.yml 文件,内容如下:
services:
    traefik: # 服务名,同一个网络中的其他服务可以直接用名称代替 IP 访问
        image: docker.youshengyun.com/base/traefik:2.11.34
        restart: on-failure:3
        networks:
            - y9-share-net
        ports:
            - "8888:8888" # 前端端口
            - "9999:9999" # 后端端口
            - "8088:8080" # Web UI 端口 (enabled by --api.insecure=true)
        environment:
            - TZ=Asia/Shanghai
        volumes:
            # 需要将 docker 套接字挂载到容器中,方便 traefik 访问 docker 的 api 发现各个配置了 traefik 标签的服务
            - "/var/run/docker.sock:/var/run/docker.sock"
            # 也可通过文件配置 traefik 的动态配置
            - "/data/traefik:/etc/traefik/dynamic"
        command:
            - "--global.sendanonymoususage=false"
            - "--global.checknewversion=false"
            - "--api=true"
            - "--api.dashboard=true"
            - "--api.insecure=true"
            - "--api.debug=false"
            - "--ping=true"
            - "--log.level=DEBUG" # 日志级别,根据实际情况调整
            - "--log.format=common"
            - "--accesslog=true" # 启用访问日志,根据实际情况调整
            - "--entrypoints.web.address=:8888" # 定义前端的端口,类似于 nginx 中 http.server.listen 的端口
            - "--entrypoints.web.forwardedHeaders.insecure"
            - "--entrypoints.api.address=:9999" # 定义后端的端口,类似于 nginx 中 http.server.listen 的端口
            - "--entrypoints.api.forwardedHeaders.insecure"
            - "--entrypoints.traefik.address=:8080"
            - "--providers.docker=true"
            - "--providers.docker.watch=true"
            - "--providers.docker.exposedbydefault=false"
            - "--providers.docker.endpoint=unix:///var/run/docker.sock"
            - "--providers.docker.useBindPortIP=false"
            - "--providers.docker.network=y9-share-net"
            - "--providers.file=true"
            - "--providers.file.watch=true"
            - "--providers.file.directory=/etc/traefik/dynamic"
            - "--providers.file.debugloggeneratedtemplate=true"
        logging:
            driver: "json-file"
            options:
                max-size: "1m"
        healthcheck:
            test: ["CMD-SHELL", "wget -q --spider --proxy off localhost:8080/ping || exit 1"]
            interval: 30s
            timeout: 5s
            retries: 3
            start_period: 10s
networks:
    y9-share-net:
        external: true
执行命令创建数据目录并启动 Traefik:
$ mkdir -p /data/traefik
$ docker compose -f docker-traefik.yml up -d
Nginx
Nginx 用于静态资源的访问和反向代理。 创建 docker-nginx.yml 文件,内容如下:
services:
    frontend: # 服务名,同一个网络中的其他服务可以直接用名称代替 IP 访问
        image: docker.youshengyun.com/base/nginx:1.26.3
        restart: on-failure:3
        #ports:
        #- "8888:80"
        environment:
            - TZ=Asia/Shanghai
        volumes:
            - "/data/nginx/html:/usr/share/nginx/html:ro"
            - "/data/nginx/conf/nginx.conf:/etc/nginx/nginx.conf:ro"
        labels:
            - "traefik.enable=true"
            - "traefik.http.routers.frontend.entrypoints=web"
            - "traefik.http.routers.frontend.rule=Host(`123.123.123.123`)" # host 匹配,根据实际情况调整
            - "traefik.http.routers.frontend.service=frontend"
            - "traefik.http.routers.frontend.priority=1"
            - "traefik.http.services.frontend.loadbalancer.passHostHeader=true"
            - "traefik.http.services.frontend.loadbalancer.server.port=80"
        networks:
            - y9-share-net
        healthcheck:
            test: ["CMD-SHELL", "curl -fs http://localhost/ || exit 1"]
            interval: 30s
            timeout: 5s
            retries: 3
            start_period: 10s
networks:
    y9-share-net:
        external: true
执行命令创建数据目录和配置文件目录:
$ mkdir -p /data/nginx/{html,conf}编辑 nginx 配置文件 /data/nginx/conf/nginx.conf,内容如下:
worker_processes auto;

error_log  /var/log/nginx/error.log notice;
pid        /var/run/nginx.pid;

events {
    worker_connections 4096;
    use epoll;
}

http {
    include mime.types;
    default_type application/octet-stream;
    sendfile off;
    server_names_hash_bucket_size 128;
    client_body_timeout 600;
    client_header_timeout 600;
    client_header_buffer_size 512k;
    large_client_header_buffers 4 512k;
    client_max_body_size 1024m;
    keepalive_timeout 600;
    send_timeout 600;
    keepalive_requests 60;
    fastcgi_connect_timeout 60m;
    fastcgi_read_timeout 60m;
    fastcgi_send_timeout 60m;
    proxy_read_timeout 60m;
    underscores_in_headers on;
    gzip  on;
    map $http_upgrade $connection_upgrade {
        default upgrade;
        '' close;
    }

    log_format  main  '$remote_addr - $remote_user [$time_local] "$request" '
                      '$status $body_bytes_sent "$http_referer" '
                      '"$http_user_agent" "$http_x_forwarded_for"';
    access_log  /var/log/nginx/access.log  main;

    server {
        listen       80;
        listen  [::]:80;

        absolute_redirect off; # 关闭绝对重定向,上层代理跟 nginx 使用不同端口的时候有用
        root /usr/share/nginx/html;

        location = / {
                return 302 /home/;
        }

        location ~^/([a-zA-Z0-9\-]+)/(.*)$ {
            try_files $uri $uri/ /$1/index.html;
            add_header Cache-Control 'no-cache';
        }
    }

}
执行命令启动 Nginx:
$ docker compose -f docker-nginx.yml up -dNacos
Nacos 是一个开源的动态服务发现、配置和服务管理平台。
nacos 启动之前需要在 mysql 中创建 nacos 库,执行 SQL 文件:mysql-schema.sql。
创建 docker-nacos.yml 文件,内容如下:
services:
    nacos: # 服务名,同一个网络中的其他服务可以直接用名称代替 IP 访问
        image: docker.youshengyun.com/base/nacos/nacos-server:v2.2.1
        restart: on-failure:3
        networks:
            - y9-share-net
        ports:
            - "8848:8848"
            - "9848:9848"
        environment:
            - TZ=Asia/Shanghai
            - PREFER_HOST_MODE=hostname
            - MODE=standalone
            - SPRING_DATASOURCE_PLATFORM=mysql
            - MYSQL_SERVICE_HOST=mysql
            - MYSQL_SERVICE_DB_NAME=nacos
            - MYSQL_SERVICE_PORT=3306 # mysql 端口,按需调整
            - MYSQL_SERVICE_USER=root # mysql 用户,按需调整
            - MYSQL_SERVICE_PASSWORD=111111 # mysql 密码,按需调整
            - MYSQL_SERVICE_DB_PARAM=characterEncoding=utf8&connectTimeout=1000&socketTimeout=3000&autoReconnect=true&useSSL=false&allowPublicKeyRetrieval=true
            - NACOS_AUTH_ENABLE=true
            - NACOS_AUTH_IDENTITY_KEY=nacos # nacos 用户,按需调整
            - NACOS_AUTH_IDENTITY_VALUE=nacos  # nacos 密码,按需调整
            - NACOS_AUTH_TOKEN=VGhpc0lzTXlDdXN0b21TZWNyZXRLZXkwMTIzNDU2Nzg=
        labels:
            - "traefik.enable=true"
            - "traefik.http.routers.nacos.entrypoints=web"
            - "traefik.http.routers.nacos.rule=PathPrefix(`/nacos`)" # host 匹配,根据实际情况调整
            - "traefik.http.routers.nacos.service=nacos"
            - "traefik.http.services.nacos.loadbalancer.passHostHeader=true"
            - "traefik.http.services.nacos.loadbalancer.server.port=8848"
        healthcheck:
            # 可结合 SpringBoot 的 Actuator 并开启相应的端点做健康检查
            test: ["CMD-SHELL", "curl -fs http://localhost:8848/nacos/actuator/health/liveness || exit 1"]
            interval: 10s
            timeout: 2s
            retries: 3
            start_period: 1m
networks:
    y9-share-net:
        external: true
执行命令启动 Nacos:
$ docker compose -f docker-nacos.yml up -d部署完成后可以通过访问 http://localhost:8848/nacos/ 访问 nacos
应用部署
公网 IP:123.123.123.123,此处仅为举例假设,根据实际情况调整。
后端部署
在后端部署中仅以 platform 和 sso 两个工程为例,其他工程类似。后端的部署我们在 portainer 中进行,简化操作。
为了进一步实现构建一次,到处运行的目标,后端项目中使用 spring profile 做多环境配置,镜像只打包一次,各个环境使用的时候设置相应的环境变量或者命令行参数来指定相应的 profile 使对应的配置文件生效, 并结合 Spring Cloud Config 和 Nacos 来实现配置的动态化。 具体可参考如何使用 SpringCloud 的远程配置?
platform
连接数据库新建数字底座公共库 y9_public。
新建 stack,输入 stack 名称为 app-platform,输入 docker compose 内容:
services:
    platform: # 服务名,同一个网络中的其他服务可以直接用名称代替 IP 访问
        # 其中 main 为命名空间对应 harbor 的项目,risenet-y9boot-server-platform 为镜像名称对应 maven 的 artifactId
        image: docker.youshengyun.com/main/risenet-y9boot-server-platform:v9.6.x
        restart: on-failure:3
        networks:
            - y9-share-net
        environment:
            - TZ=Asia/Shanghai
            - SPRING_PROFILES_ACTIVE=test # 激活的 profile
            - NACOS_PASSWORD=111111 # nacos 密码,按需调整
            - JAVA_OPTS=-Xms512m -Xmx1500m # jvm 内存设置,按需调整
        labels:
            - "traefik.enable=true"
            # 定义名为 platform 的 HTTP 路由器(router),它使用名为 api 的入口点,也就是对应端口 9999
            - "traefik.http.routers.platform.entrypoints=api"
            # 定义路由规则,匹配以 /server-platform 开头的请求
            - "traefik.http.routers.platform.rule=PathPrefix(`/server-platform`)"
            # 当 platform 路由器匹配到请求时,应该将请求转发给名为 platform 的服务
            - "traefik.http.routers.platform.service=platform"
            # 当 Traefik 把请求转发给后端服务时,会把原始的 Host 头部保留下来。
            - "traefik.http.services.platform.loadbalancer.passHostHeader=true"
            # 后端服务监听的端口为 8080。
            - "traefik.http.services.platform.loadbalancer.server.port=8080"
#        healthcheck:
#            # 可结合 SpringBoot 的 Actuator 并开启相应的端点做健康检查
#            test: ["CMD-SHELL", "curl -fs http://localhost:8080/server-platform/actuator/health || exit 1"]
#            interval: 10s
#            timeout: 2s
#            retries: 3
#            start_period: 1m
networks:
    y9-share-net:
        external: true
点击 Deploy the stack 按钮即可将对应的镜像拉取并启动容器。
sso
新建 stack,输入 stack 名称为 app-sso,输入 docker compose 内容:
services:
    sso: # 服务名,同一个网络中的其他服务可以直接用名称代替 IP 访问
        # 其中 main 为命名空间对应 harbor 的项目,risenet-y9boot-webapp-sso 为镜像名称对应 maven 的 artifactId
        image: docker.youshengyun.com/main/risenet-y9boot-webapp-sso:v9.6.x
        restart: on-failure:3
        networks:
            - y9-share-net
        environment:
            - TZ=Asia/Shanghai
            - SPRING_PROFILES_ACTIVE=test
            - NACOS_PASSWORD=111111
            - JAVA_OPTS=-Xms512m -Xmx1500m # jvm 内存设置,按需调整
        labels:
            - "traefik.enable=true"
            # 由于 sso 非前后端分离,所以与上方 platform 不同,使用的是名为 web 的入口点,对应 8888 端口
            - "traefik.http.routers.sso.entrypoints=web"
            - "traefik.http.routers.sso.rule=PathPrefix(`/sso`)"
            - "traefik.http.routers.sso.service=sso"
            - "traefik.http.services.sso.loadbalancer.passHostHeader=true"
            - "traefik.http.services.sso.loadbalancer.server.port=8080"
#        healthcheck:
#            # 可结合 SpringBoot 的 Actuator 并开启相应的端点做健康检查
#            test: ["CMD-SHELL", "curl -fs http://localhost:8080/sso/actuator/health || exit 1"]
#            interval: 10s
#            timeout: 2s
#            retries: 3
#            start_period: 1m
networks:
    y9-share-net:
        external: true
点击 Deploy the stack 按钮即可将对应的镜像拉取并启动容器。
前端部署
前端应用修改配置文件后,将对应的打包目录放到上面 nginx 的 html 目录下,对应上方 nginx 容器映射的本机 /data/nginx/html 目录
访问测试
经过以上操作,数字底座的中间件和应用就部署完成了,然后公网 IP 也开放了相应的端口,接下来就可以进行访问测试。
例如访问数字底座管理平台, http://123.123.123.123:8888/kernel-standard/